
Monday, April 7, 2025
Study of Osmosis by Potato Osmometer, Biology practical std 11 & 12
Study of Osmosis by Potato Osmometer,


.PNG)


 |
| Potato Osmosis practical |
Study of Osmosis by Potato Osmometer
AIM :- To study osmosis by potato osmometer.
INSTRUMENTS AND MATERIALS Petridish, scalpel, pins, Potatoes, sugar, water, eosine (stain).
Conclusion :-
(A) When Potato bath is placed in Hypotonic solution due to osmosis the water flows from petridish containing hypotonic solution to the hypertonic solution in the potato bath and water level increases.
(B) When potato bath is placed in hypertonic solution due to osmosis the water flows from potato bath containing hypotonic solution to the hypertonic solution in petridish and water level decreases.
(C) Water flows from petridish to potato bath containing concentrated NaCl (Hypertonic solution)
More Details View Video :
Study of Osmosis by Potato Osmometer,
To prepare ammonia gas in the laboratory and study its properties GSEB std 8 to 12
 |
| Prepare Ammonia Gas |
To prepare ammonia gas in the laboratory
AIM : To prepare ammonia gas in the laboratory and study its properties
THEORY : On
heating a mixture of ammonium chloride and calcium hydroxide, we get ammonium
gas.
APPARATUS : Big hard glass tube, delivery tube, hollow
glass tube, Bunsen burner, glass rod, two single-holed rubber cork, four to
five gas jar with lids, stand and one CaO bottle as shown in the figure.
CHEMICALS : Calcium hydroxide, ammonium chloride,
concentrated hydrochloric acid, red and blue litmus papers.
Preparation of Ammonia gas
 |
| Prepare Ammonia Gas In Laboratory (step-1) |
 |
| Prepare Ammonia Gas In Laboratory (step-2) |
 |
| Prepare Ammonia Gas In Laboratory (step-3) |
 |
| Prepare Ammonia Gas In Laboratory (step-4) |
 |
| Prepare Ammonia Gas In Laboratory (step-5) |
 |
| Prepare Ammonia Gas In Laboratory (step-6) |
i. Colour of ammonia gas :
ii. Odour or smell of ammonia gas :
iii. Ammonia gas is collected by downhard displacement of air therefore it is than air.
iv. Use moist red and blue litmus papers and check the effect on ammonia gas and conclude :
Wet red litmus :
Wet blue litmus :
Conclusion
:
What happens
when a glass rod is dipped in concentrated HCL is brought near the mouth of gas
jar containing ammonia ?
CONCLUSION
PRACTICAL USES
Ammonia is used in the manufacture of fertilizers, nitric
acid, nylon fibers and in many organic chemicals.
To prepare Soap by cold process. Science practical GSEB for std 8 to 12.
 |
| Soap making practical |
AIM
: To prepare soap by cold process.
THEORY :
Sodium hydroxide and vegetable oil reacts to give soap and the process
is called saponification.
APPARATUS
: Beaker, glass-rod, bunsen burner,
mould, wire gauze, Sodium hydroxide, vegetable oil, Soap, Sodium hydroxide, vegetable
oil, Salt,
CHEMICALS
: Sodium hydroxide, vegetable oil (castor oil) and salt.
 |
| Soap making with cold process |
 |
| Soap making with cold process |
 |
| Soap making with cold process |
 |
| Soap making with cold process |
 |
| Soap making with cold process |
Conclusion
:
Uses : Soap is used to remove dirt from the surface of clothes.
For more details view Video :
Uses : Soap is used to remove dirt from the surface of clothes.
For more details view Video :
Soap making with Cold Process.
MEASUREMENT OF RESISTANCE ( WHEATSTONE’S BRIDGE) gseb std 11 & 12 physics practical.
 |
| Wheatstone's bridge |
MEASUREMENT OF RESISTANCE
(
WHEATSTONE’S BRIDGE)
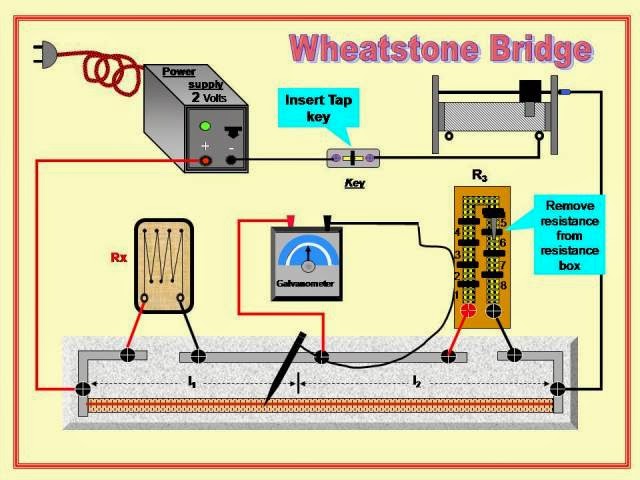
Condition (1) :- MEASUREMENT OF RESISTANCE
AIM :-
You are given a Wheatstone bridge and
other necessary instruments. Find the values of the unknown resistance Rx.
Exchange the positions of unknown resistance and resistance box in the gaps of
Wheatstone bridge and repeat the experiment.
PRINCIPLE :-
It works on the principle of balanced
Wheatstone bridge.
Apparatus :-
Wheatstone-bridge (meter-bridge),
2 Volt Battery,
Rheostat,
Galvanometer,
Jockey,
Key,
Resistance box(1 – 100 W),
Resistance coil.
Precautions
- Make proper and tight connections.
- Keep the keys tightly closed in the resistance box.
- Adjust the value of resistance box so that null point is
obtained between 40 cm and 60 cm.
- Do not slide the jokey continuously over the wire.
Note :- Keep high resistance of rheostat in the
beginning of each observation so that current is less and the galvanometer is
not damaged. After getting approximate position of null point only decrease the
resistance of rheostat.
 |
| Wheatstone's bridge Appartatus |
 |
| Wheatstone's bridge Practical |
 |
| Wheatstone's bridge |
 |
| Wheatstone's bridge Observation table |
Wheatstone
Bridge ( Line Diagram
)
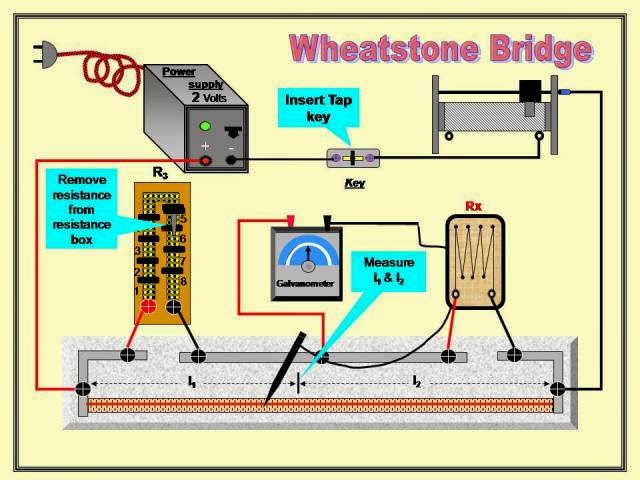
(2)
Condition :- Interchange unknown resistance Rx
between P – Q.
 |
| Wheatstones bridge appartatus |
 |
| Wheatstone's bridge practical |
 |
| Wheatstones bridge observation table |
 |
| Wheatstosnes bridge conclusion |
MEASUREMENT OF RESISTANCE
( WHEATSTONE’S BRIDGE)
Subscribe to:
Posts (Atom)